About two years ago I took on the job of gutting and renovating my kitchen. I was the recent recipient of a full set of kitchen cabinets from a neighbor. She had just had her kitchen remodeled and was sitting on a set of old solid wood cabinets so I asked to have them. Upon receiving the cabinets I began to plan.
Google Sketchup was a very useful tool in building my kitchen. Sketchup a very powerful 3D sketching program that is easy to learn. Laying out the plan for my kitchen in Sketchup was an invaluable step in building my kitchen. Even though I did not follow my design exactly, I was able to visualize and note precise measurements needed in the building of my kitchen.
With my design in mind I began to destroy my old kitchen (Unfortunately I don't have any “before” pictures). I first emptied my cabinets into my dining room stacking everything as neatly as possible. I then moved my furniture (A set of shelves and an island) and my counter-top microwave. I then unplugged my fridge and moved it into the DR as well.
***Remember to leave your fridge unplugged for at least five minutes before turning it back on. Compressors do not like to be turned on again immediately.*** I then made sure that the water under my sink was turned off at the source. After that I shut off the gas at the source and at the valve behind the stove and removed the sink and stove.
****Do not mess with your gas line unless you really know what you are doing. If you do alter your gas line in any way have it inspected and certified by a professional. Not doing so could void your home insurance in the event of an accident****.
My kitchen was now free of all the major appliances. All that was left were my cabinets, drop ceiling and horrible fluorescent light. I carefully pulled the cabinets down and put them on craigslist in the free section. In two days they were gone. I also pulled down my drop ceiling to discover the original clapboard ceiling. I then shut off the breaker for the overhead light and removed it.
****Do not fool around with electricity unless you know what you are doing. Doing so can result in death. If you do work on your electrical system make sure that it is up to code.*****
Finally my kitchen was an empty box. I could now begin the remodel.
The first thing I did was have the gas line moved to the planned location for my new stove. This was one of my biggest expenditures, but I wanted it done correctly and inspected.
I then leveled the floor and laid the tile. I opted for VCT (vinyl composite tile) because of it's durability and economy. VCT is the tile that you find in schools and such. Before laying the tiles I had to level the original floor with floor leveler which is primarily Portland cement. This was a daunting job that I had to fudge by using a finishing sander and 80 grit sandpaper. I just could not seem to screed it smooth with a 10” knife. But when all was said and done the floor turned out OK. In laying the tiles I found that my scroll saw was very useful. This tool made it very easy to cut the tile into the shapes needed to tile around pipes and door jambs.
After laying the tile I filled all of the holes I could find (around pipes etc) with expanding foam in a spray can. Make sure that you get the kind that dries solid.
I then began to piece together the cabinets so that they would fit in the kitchen. Since I had to work with what I had, I had to improvise as I went along. It turned out that I used every cabinet that my friend had given me and that I needed 2 more 30 inch base cabinets for either side of the stove. Now some people in this situation might go to one of the big box hardware stores to pick up these pieces, but not Ace Potato. I found a non-profit in Baltimore called The Loading Dock (
http://www.loadingdock.org/). The Loading Dock takes donations of used home improvement supplies from contractors and sells them at a deep discount to the public. I found a pair of cabinets that matched each other and took them home.
I now had to hang the over counter cabinets. I have 9 ft ceilings so I hung them ascetically. They are a little high but the kitchen looks nicer this way. My house was built in 1920 so there is no drywall. Some of my walls are plaster-on-brick and some are plaster-on-lathe hung on unevenly spaced studs so this was a daunting job as well. My first step in hanging these cabinets was to provide a solid place to hang them from. I first cut pieces of ¾” plywood that matched the dimensions of my cabinets. On my plaster-on-brick wall I hung these boards with masonry screws (
http://www.tapcon.com/). On my plaster-on-lathe wall I hung them with wood screws from the studs (the studs were almost impossible to find). After hanging the boards I hung the cabinets. This took some time but it really gave me a solid place to hang the cabinets. The cabinets would probably break before coming off of the wall. Also hanging the cabinets this way gave me the opportunity to level them twice, once in hanging the boards and once in hanging the cabinets. I now have very true and solid over-counter cabinets. If your house is framed out with drywall and wooden studs the job will be much easier. Make sure that you secure your cabinets to the studs.

The most difficult job I had was to cut the counter-top . I will not go into details other than to say that I gave the cutting of the top hours of thought as to how to do it. If I messed up one cut I would be out about $100. I am happy to say that everything went great and I did it on the first try. This was a true instance of “measure twice, cut once”. I actually must have measured 100X. This web page was invaluable:
http://www.hammerzone.com/archives/kitchen/countr/install2.html Remember that after cutting the hole for the sink the counter is extremely fragile. Ask a couple of people to help to install it.
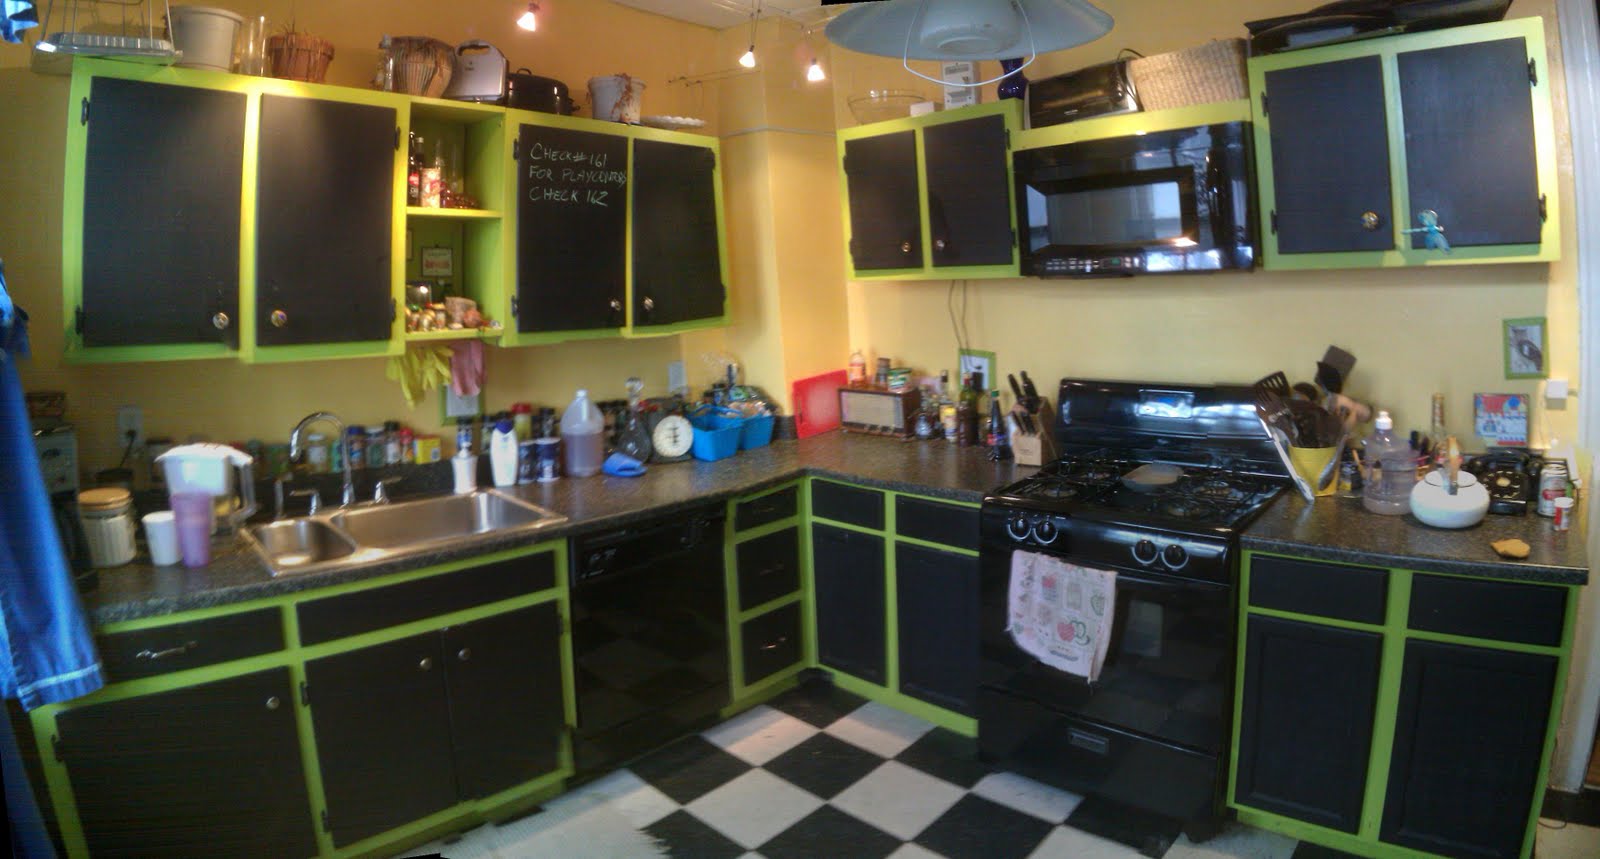
After installing the cabinets, Mrs. Potato and I painted everything. I learned two important words at this time: Kilz and Zinnser. Kilz is a primer that will cover up just about everything. Zinnser is a primer that will stick to just about everything. Mrs. potato had a stroke of genius in requesting that the cabinet doors be painted with chalkboard paint. We can now leave notes to each other and write our grocery list right on the cabinets.
The appliances were next. I acquired a stove for free from craigslist and a refrigerator from a friend also free. I acquired an under-counter dishwasher from the dump (free) and an over-counter microwave from craigslist for $50 (an almost brand new LG). I got a 2 basin stainless steel sink and insinkerator garbage disposal from a house rehab that I just happened to pass on my way to Baby Red's babysitter (free). The lighting I got at Ikea.
So lets figure this out
Labor $0
Sink $0
Faucet $40
Dishwasher $0
Stove $0
Fridge $0
Cabinets $60
Flooring ~ $150
Counter ~ $160
Electrical ~ $150 (Did it myself)
lighting ~$50
Gas line relocation $300 (Professionally done)
Paint ~$175
lumber ~ $100
Incidentals ~$150
Add it all up and you get $1335, and that is no joke.
To be honest I had to replace both the stove and the dishwasher eventually as they both gave up the ghost. I only paid $30 for a replacement dishwasher at Habitat for Humanity's Restore (
http://www.habitat.org/env/restores.aspx) and Gramma and Grampa Potato bought us a new stove for the holidays!
Today the average cost of a kitchen remodel is between $15,000 and $26,000 (
http://www.doityourself.com/stry/kitchenbathfaq).
I think that I did alright.
When you look for deals be prepared to get some duds. In the long run you still end up saving boatloads of $$$!!!


No comments:
Post a Comment